Crumbs: Our cookie consent npm package


Cookies. Most of us love eating them but most likely these days we are either accepting or customising them to use most of our favourite websites. With Krystal having multiple different products under our umbrella we often have the need to have a consistent approach to certain aspects of the application/website and cookie consent notices neatly falls into this bracket. With some recent updates that we were planning to make to DeployHQ, we took the opportunity to build out our own cookie consent add-on that could be customised depending on a site's requirements.
After some initial research into current cookie consent implementations we noticed that they tend to be on the bulkier side in terms of resource size therefore building something lightweight became our first priority.
Other factors that we wanted to incorporate in the add-on were:
- Completely customisable in terms of styling.
- Different types of cookies could be defined depending on the use case.
Enter Crumbs! Let's walk through how to get started with Crumbs and how we are using it on DeployHQ.
If you want to dive into the code yourself then you can head over to the Github repo.
Installation
npm install krystal-crumbs --saveUsage
Once installed you can import and initialise Crumbs by doing the following:
import Crumbs from 'krystal-crumbs';

const cookies = new Crumbs();
Along with some basic options such as providing a custom cookie name and the length of time the cookie should be stored for we will explore how to add different types of cookies depending on your needs.
This is done by passing in an array of objects named types to the Crumbs constructor which then in turn requires certain properties. Here is what the types array looks like for our implementation on DeployHQ:
const cookies = new Crumbs({
// Other declarations
types: [
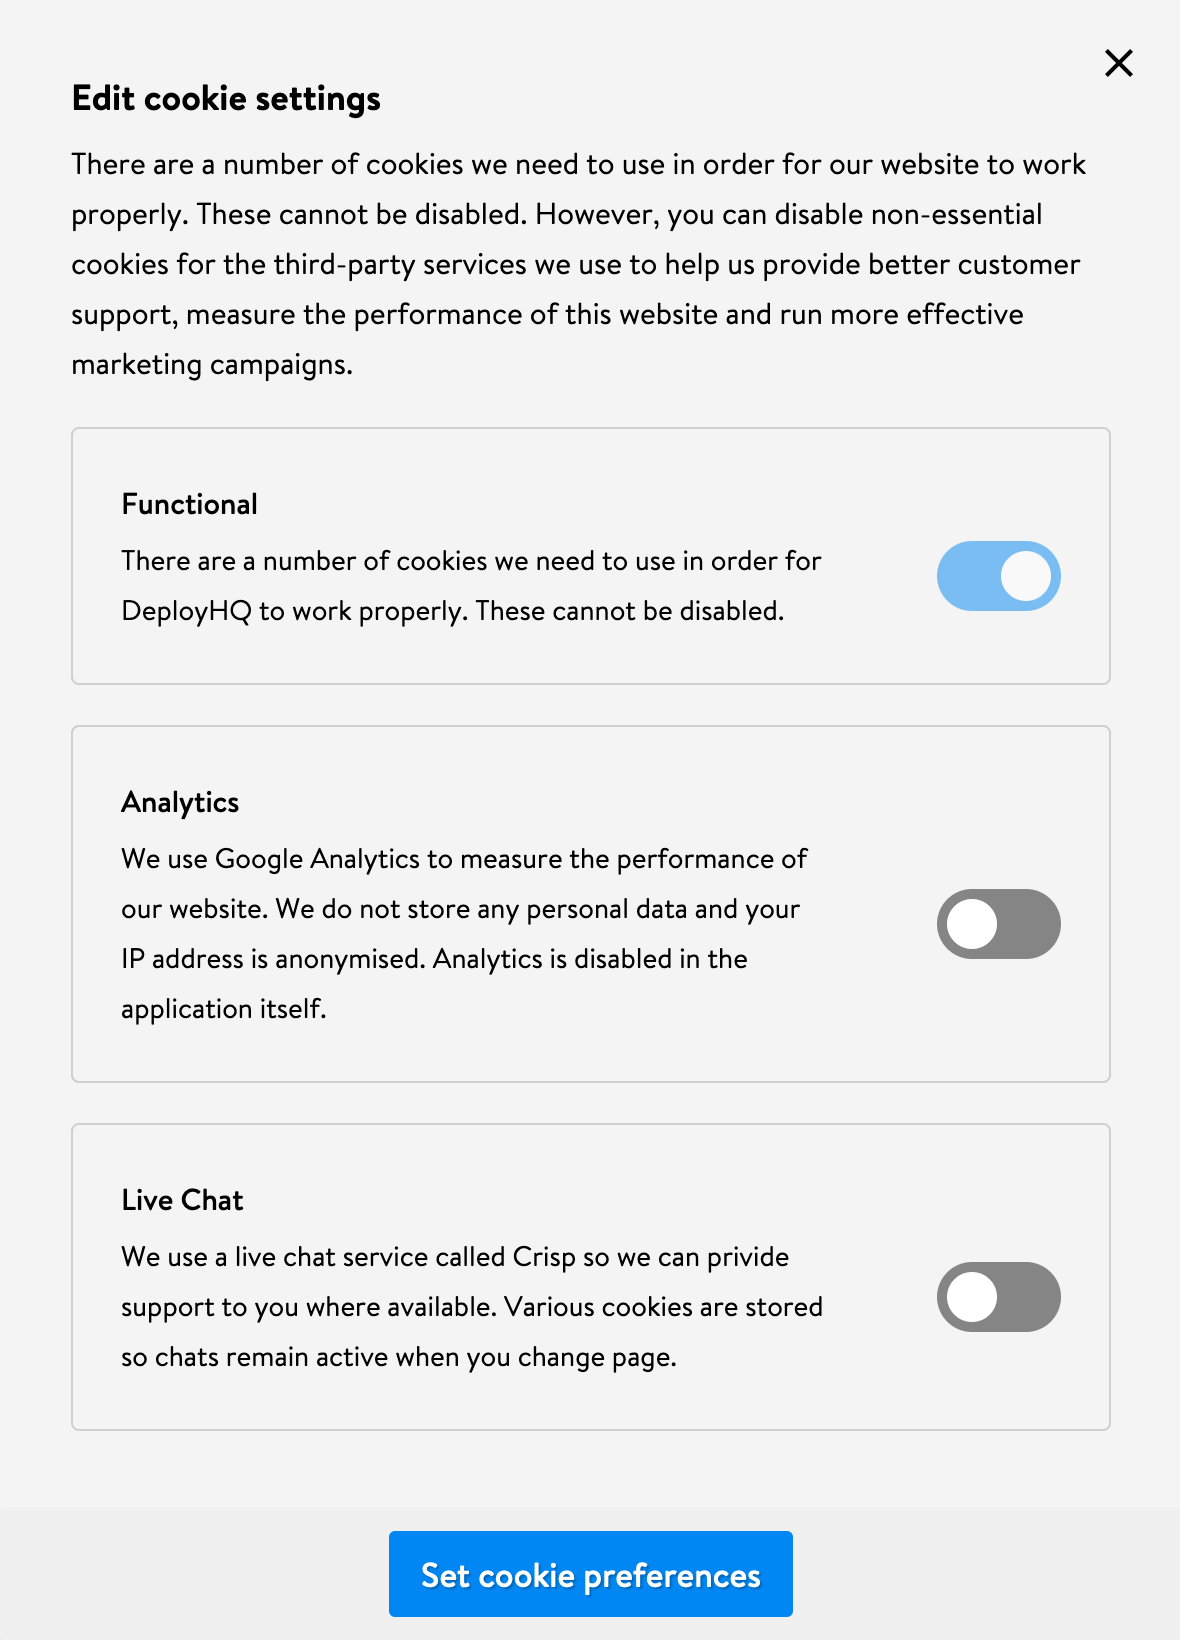
{
identifier: 'functional',
required: true,
summary:
'There are a number of cookies we need to use in order for DeployHQ to work properly. These cannot be disabled.',
title: 'Functional',
},
{
identifier: "analytics",
required: false,
summary:
"We use Google Analytics to measure the performance of our website. We do not store any personal data and your IP address is anonymised. Analytics is disabled in the application itself.",
title: "Analytics",
},
{
identifier: "live_chat",
required: false,
summary:
"We use a live chat service called Crisp so we can privide support to you where available. Various cookies are stored so chats remain active when you change page.",
title: "Live Chat",
},
]
})When the required attribute is set to true for a certain type then this will indicate to Crumbs that we would like this particular section to be enabled by default. By allowing this option it gives you the ability to communicate to your users that this cookie category falls under the type that cannot be turned off and as you can see from our example we can use the summary property to explain why this is the case. What a win!
Let's continue with our initial example and work through a more detailed explanation on how we can leverage Crumbs to determine if we are able to set the relevant cookies for Google Analytics.
Example
Within your own application you can listen to the onSave event and do as you wish with the accepted preferences. In our example we are going to listen for a custom Google Tag Manager (GTM) event and with the logic we have in GTM, this will then determine what cookies are set.
cookies.on('onSave', (preferences) => {
	window.dataLayer &&
    window.dataLayer.push({
	    event: "your-custom-event-name-here"
    });
});
When the user accepts their chosen cookie settings then Crumbs will set each type to be a boolean value depending on the acceptance status. If we take our example and accept 'functional', 'analytical' but reject the 'live-chat' options then Crumbs will set our cookie to the following key value pair:
| Name | Value |
|---|---|
| cookie_consent | v1|true|true|false |
Within GTM we can then use a regular expression in order to determine if the analytics type has been set to true by creating a rule as follows:
^v1|(true|false)|true|(true|false)$
The order here is important. The second item, which is highlighted in bold above, relates to the second item in the types array therefore it is essential that these match up. If this condition is true then we can then go ahead and trigger our custom event in order to let Google Analytics know that we are ok to start recording relevant information.
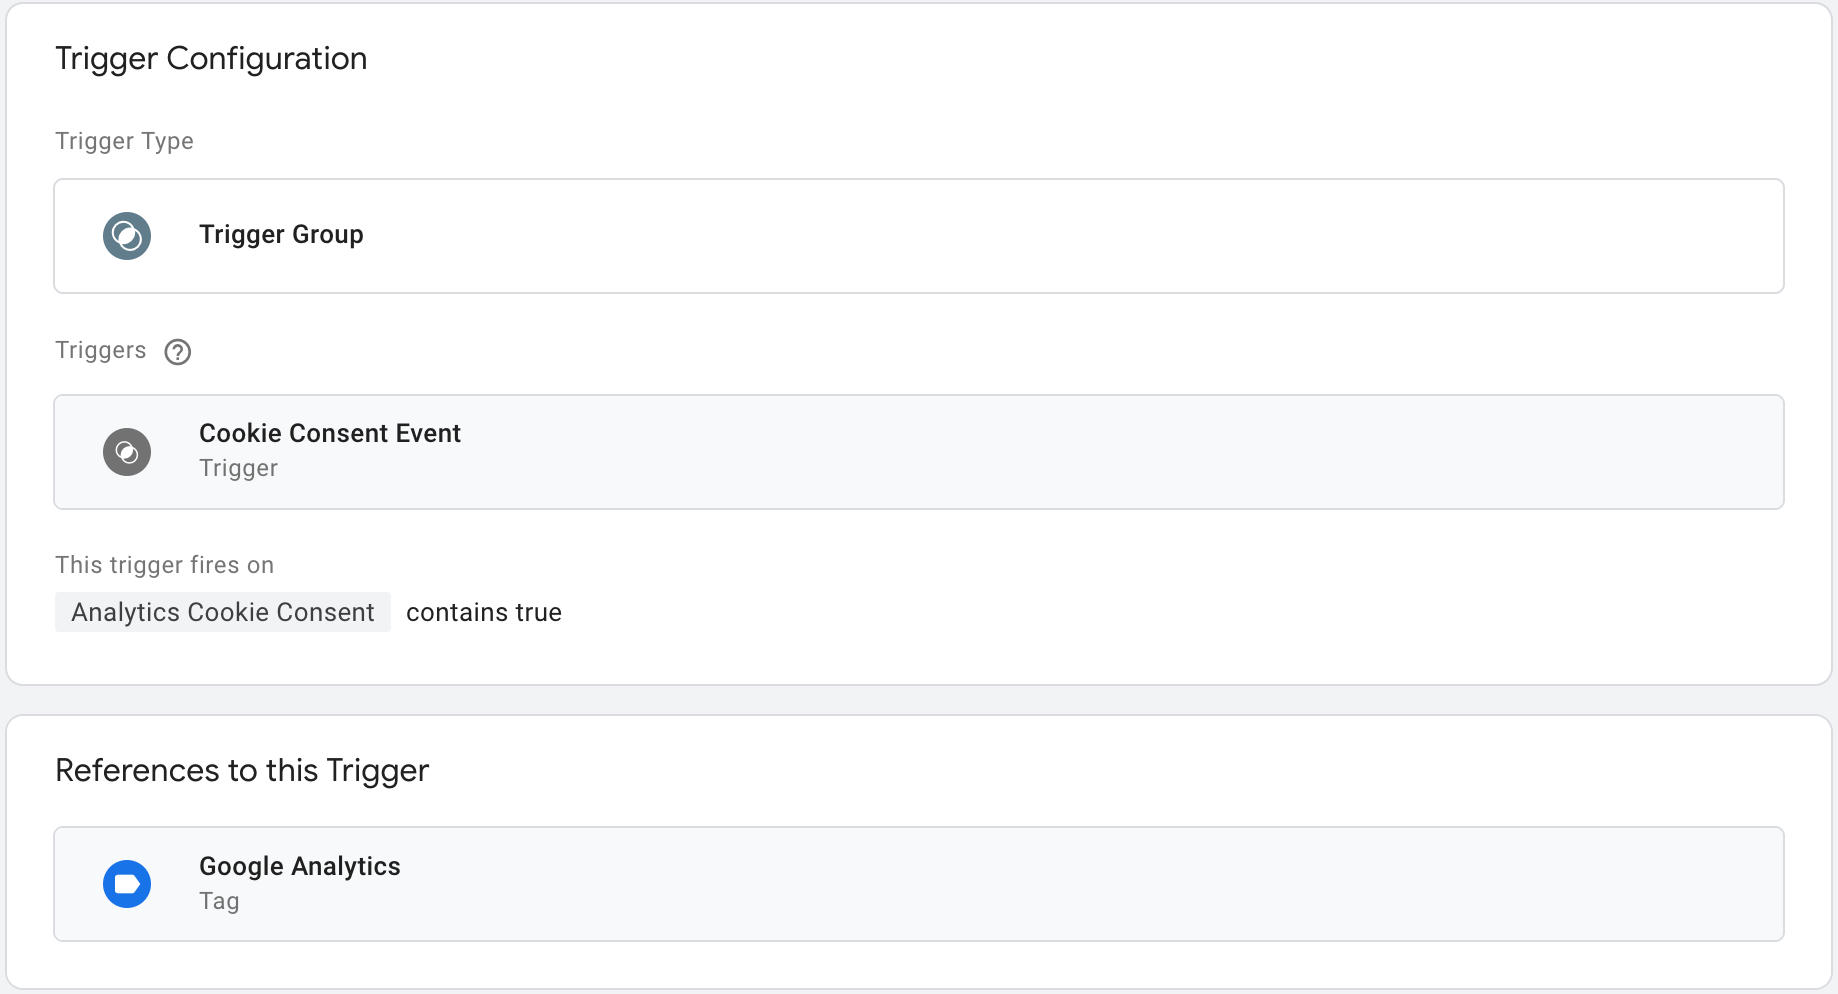
There are a lot of moving parts here however, as you can see from the screenshot above the basic premise is that if our custom GTM event for setting analytical cookies contains a value of true then we give our application the go-ahead to set the relevant cookies for Google Analytics.
Along with the other options that you can provide Crumbs, then you will end up with something that will look like the following (when the edit modal is open).
The styling will be dependent on yourself, however let's touch on how some simple css declarations can help you customise Crumbs to fit your needs.
Styling
The styling of Crumbs has been deliberately left up to yourself apart from only some basic positioning, which you can override if required.
On top of this there are also various different css custom properties that you can set in order to easily customise the appearance of not only the cookie banner but also the consent modal that is used when a user would like to adjust their cookie settings.
.crumbs-banner {
    --crumbs-bg-color: #f4f4f4;
    --crumbs-edit-overlay: rgba(0, 0, 0, 0.4);
    --crumbs-edit-cta-bg: gainsboro;
    --crumbs-toggle-switch-bg: #858585;
    --crumbs-toggle-checked-bg: #e0e0e0;
    --crumbs-toggle-border-color: #dddddd;
    --crumbs-toggle-switch-focus-border-color: #636363;
}
These could also easily be set to custom properties themselves. Let's take the example of the --crumbs-bg-color. You could set this to something like the following example:
:root {
	--bg-color: whitesmoke;
}

.crumbs-banner {
	--crumbs-bg-color: var(--bg-color);
}
This can make it a little easier to manage any sort of theming that you have in your application/website such as a dark or high contrast mode.
Now that we have walked through a detailed example of how Crumbs can be applied to an existing site/application, let's dig a little deeper into the inner workings of the library!
Under the Hood
At its core, Crumbs is a JavaScript class which on initialisation sets up some required properties and calls our initial render method which in our case handles the insertion of the banner into the DOM as well as adding a few different event listeners that we need for the acceptance of cookies and for giving the option to edit the default settings.
Here is what our base looks like:
class Crumbs extends EventEmitter {
	constructor({ cookieName, domain, days, editCookieButton, types }) {
    super();
    this.cookieName = cookieName || "cookie_consent";
    this.domain = domain;
    this.days = days;
    this.editCookieButton = editCookieButton;
    this.types = types;
    this.render();
  }

  // Some methods

}
Editing Cookies
As well as being able to accept all cookies it is especially important that we allow users to change their preferences at any time. Crumbs lets you do this by passing in reference to a button element in your application.
If we revisit our previous example when initialising except this time we pass in a DOM element thats job will be to handle the editing of our cookie settings.
const editButton = document.querySelector(".your-button-element");

const cookies = new Crumbs({
	// other declarations
	editCookieButton: editButton
});
After we give this option to the user then we will also need a way to update the preferences and let our application know that the cookie preferences of the user have been updated. Below is a compressed look at how we do this in Crumbs.
acceptCookies() {

    const checkboxes = [...
      this.editScreen.querySelectorAll('input[type="checkbox"]')
    ];

    const accepted = checkboxes
      .filter((checkbox) => checkbox.checked)
      .map((c) => c.name);

    this.emit('onSave', accepted);

    // Other code

  }
Here we are selecting all the checkboxes that exist within our edit screen, filtering out the ones that are checked and then extracting the name of each of these into a new array of accepted values which we then pass onto our emit method which is inherited from the EventEmitter class.
Trapping Focus
With our implementation utilising a modal, as part of its approach then it is important for keyboard users that we trap the focus within the popup when the edit modal is open.
We can get started on adding this with the following code:
const focusableElements = [
      ...this.editScreen.querySelectorAll('input, button')
    ].filter((el) => !el.hasAttribute('disabled'));

const firstFocusableEl = focusableElements[0];
const lastFocusableEl = focusableElements[focusableElements.length - 1];
Due to the structure of our modal we know in advance that this will only contain input and button types therefore we don't need to select any a tags or any other focusable element. We also filter out any elements that have the attribute of disabled as these are not able to be focused. Now that we have an array of focuasble elements we can easily select the first and last elements which we will need in order to deal with different operations that a keyboard user could perform when tabbing through our modal.
In the below snippet we have a guard clause in place so that we can end the operation if the Tab key isn't pressed. We also have to be mindful of the Shift + Tab combination which we can handle by checking for e.shiftKey . If the 'active' element is the first in our focusableElements array then we know that we can shift the focus to the end and the opposite is true for when we get to the end of our list of elements therefore we can navigate back to the beginning.
trapFocus(e) {
    let isTabPressed = e.key === 'Tab';

    if (!isTabPressed) {
      return;
    }

    if (e.shiftKey) {
      if (document.activeElement === firstFocusableEl) {
		lastFocusableEl.focus();
        e.preventDefault();
      }
    } else {
      if (document.activeElement === lastFocusableEl) {
		firstFocusableEl.focus();
        e.preventDefault();
      }
    }
  }
The last couple of snippets aren't really anything groundbreaking however this sort of attention to detail and extra bit of effort goes a long way in providing a more inclusive user experience.
Conclusion
Hopefully this has given you an insight into how Crumbs is put together and if you would like to contribute then you can create a pull request by heading over to the Github repository and if you run into any problems then you can raise an issue.
If you have any questions then please don't hesitate to get in touch as we love getting your feedback!
You can also find Crumbs available to download on npm.